Saturday, December 27, 2014

My favorite project to date!

Can I say that I love challenges?  I really do, but I sure stress over them - especially when it is for someone else.  This was several months in the making because of the stress, worrying time that goes into the planning part of the project:}  This is the cute little table that I would be working on. She has such beautiful curves! 


The center section was particle wood and was crumbling so it had to be removed.  Using a circular saw, I removed that section and replaced it with piece of pine that I had on hand.  Knowing that it would be painted, I wasn't worried about the type of wood used.  


Once the wood was replaced I was much more confident in the whole project.  (I love working with wood, but by no means really know what I am doing)

Now the fun really begins!  Two coats of primer and two coats of paint later, this little cutie is certainly looking different.  Knowing that the owner likes red, I decided to add a little surprise.  I painted the inside of the drawers red and added some scrapbook paper.  Luckily, she really like them.  


Adding the french writing was fun and I think added a lot to the table.  The graphics were from http://thegraphicsfairy.com/


Sunday, January 13, 2013

New kitchen design

These grand babies are growing up too fast! This was the year that my second oldest granddaughter (almost 3) would get her own kitchen for Christmas.  Ever since I made the first one for our oldest granddaughter, I've known that I would make one for this little darlin' as well when she was the right age.  I've been keeping my eyes open for an entertainment center that met my requirements.  Her mom and dad wanted one just a little smaller than the first one and I wanted to make sure to get a solid wood unit.  I found one on Craigslist that was just right - not too big and not too small - and was solid wood.  When I picked it up, I kind of felt bad in buying it, because there was a little girl there that would have loved playing with it as a kitchen.   I guess it was meant to be ours though.

I am really bad at remembering to take 'before' pictures, so by the time I remembered, I had already taken off the doors and begun the sanding process.


I cut the hole for the sink and the faucet.

If you read my post for the first kitchen I made, you will see I used a metal dog bowl for the sink, and added a faucet to complete the sink area.  The stove/oven area were added and hot air balloons were the perfect view through the window.

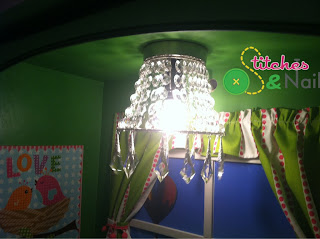
The area for the window was a little smaller on this kitchen and I was not able to find a cute chandelier that would be small enough to not be right in her face as she played, so I opted to make one myself.  Since I have not done any electrical/lamp making before, I knew I didn't want to tackle the actual workings of the light. I bought a very inexpensive 'uplight', tore it apart and used the base, some metal rings and lots of 'crystals' to make my new chandelier that would be, once again, 'just the right size'.


Since I was making new bedding and curtains for the bedroom this would be going into, I was able to use a couple of pieces of fabric from the bed skirt to make curtains for the 'window' and under the sink area.  Pink and green were colors in the fabrics so I chose those colors for the kitchen.  I also added chalkboard paint for an area for her to write her special recipes and menus and pegs for her aprons.


And now for the final reveal:


Our little darlin' has been making lots of soup and waffles for her mommie and daddy and yesterday she and I made some pies.  What fun grandparents have!

Monday, June 4, 2012

Have a Seat


It's been a while since I tackled any upholstery projects.  My office was getting ready to toss these chairs because - well you can see why! 

 
Actually, one had a broken leg and they were afraid for anyone to sit in it.  I jumped on these - what did I have to lose.  I first removed all the fabric.  A little wood glue and a couple of screws fixed the leg, and a couple of cans of off white spray paint gave me an instant improvement.
I fell in love with the fabric as soon as I saw it.  A couple of yards later, those ugly 70's chairs are now updated and cool.  The are also back where they belong - my office!
 

Sunday, January 29, 2012

Plant stand to shabby chic lamp table


Boy, has it been a long time since I have posted anything!  It is not because I have not been busy creating, just not time to share. 

Today's mission: Take a 'plain jane' plant stand and turn it into a lamp table for a sweet lady I work with.

   After cutting about 4 inches off the legs, I added a new wooden 'skirt' around the sides cut from a thin sheet of luan.  It seem to be begging for some type of ornamentation, so I added a little wooden embellishment to the front. I then sanded the whole piece in preparation for paint.

 
 My friend had requested black paint, and I loved that idea, but I just can't leave well enough alone!  I found a great design with my Silhouette that I thought would look perfect on the top.  I painted the top first with white, added the design in vinyl, then did the black painting over the whole piece.  When the paint dried, I pulled off the vinyl leaving the white design.  To keep it from looking stark white with the black top, I lightly sprayed black paint over the white design.

Hopefully she will like the table - but if she doesn't - Oh darn, I might just have to keep it!

Tuesday, November 1, 2011

To the Moon and Back

A coworker asked that I make this sign for her little granddaughter for her 2nd birthday.  The cute little knobs on the bottom are for all her necklaces and bracelets.  I think this will be a cute way to keep up with all baubles and bangles!

Sunday, August 7, 2011

Scrabble Tiles

A sweet friend recently asked me about making 'scrabble tiles' with their family names.  It took several tries to get them just like I wanted them to, but I think it's a success.  The wood was a 4 x 4 post sliced into about a million 5/8 inch thick pieces.  I sanded them smooth but after sealing with a water based sealer, the grain opened up and was roughed up again. I re-sanded and then used an oil based sealer and that was just what was needed.  They really soaked up the sealer - ( probably because of the end grain) but the grain sure looks pretty.  I cut the letters and the tiny numbers out of card stock with my silhouette and glued them down using a little Mod Podge and then coated them with another couple of coats of sealer. 


This is just spread out on the driveway.  I can't wait to see them on the wall.  The tutorial for these were found at http://www.remodelaholic.com   I am not very good at following directions :} so I probably could have saved myself some time if I had read them again when I got ready to actually start these.

Saturday, July 30, 2011

Signs


I have started crafting/making signs to help my husband come up with money for his on-going mission trips to the Amazon region of Peru and to Kenya.   He is working with the organizations of Reaching Souls International and Water 4.  Reaching Souls International trains and supports local pastors in Africa as well as other countries.  Water 4 brings water wells to remote areas next to churches. When people come to get clean water, the pastors of these local churches share Jesus with them and give them the opportunity to also have the Living Water.  The nationals are trained in drilling during this process so they can go out and bring water to more areas.

These are some of the projects that I have done this weekend.  They have been so much fun and I have so many more I am anxious to get done.  Trip to Peru is planned in September....