These grand babies are growing up too fast! This was the year that my second oldest granddaughter (almost 3) would get her own kitchen for Christmas. Ever since I made the first one for our oldest granddaughter, I've known that I would make one for this little darlin' as well when she was the right age. I've been keeping my eyes open for an entertainment center that met my requirements. Her mom and dad wanted one just a little smaller than the first one and I wanted to make sure to get a solid wood unit. I found one on Craigslist that was just right - not too big and not too small - and was solid wood. When I picked it up, I kind of felt bad in buying it, because there was a little girl there that would have loved playing with it as a kitchen. I guess it was meant to be ours though.
I am really bad at remembering to take 'before' pictures, so by the time
I remembered, I had already taken off the doors and begun the sanding
process.
I cut the hole for the sink and the faucet.
If you read my post for the first kitchen I made, you will see I used a metal dog bowl for the sink, and added a faucet to complete the sink area. The stove/oven area were added and hot air balloons were the perfect view through the window.
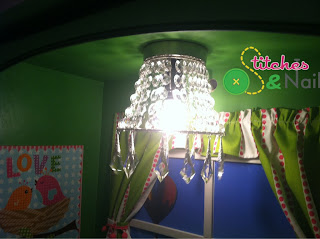
The area for the window was a little smaller on this kitchen and I was not able to find a cute chandelier that would be small enough to not be right in her face as she played, so I opted to make one myself. Since I have not done any electrical/lamp making before, I knew I didn't want to tackle the actual workings of the light. I bought a very inexpensive 'uplight', tore it apart and used the base, some metal rings and lots of 'crystals' to make my new chandelier that would be, once again, 'just the right size'.
Since I was making new bedding and curtains for the bedroom this would be going into, I was able to use a couple of pieces of fabric from the bed skirt to make curtains for the 'window' and under the sink area. Pink and green were colors in the fabrics so I chose those colors for the kitchen. I also added chalkboard paint for an area for her to write her special recipes and menus and pegs for her aprons.
And now for the final reveal:
Our little darlin' has been making lots of soup and waffles for her mommie and daddy and yesterday she and I made some pies. What fun grandparents have!


Every bit as super as the first! Great job!
ReplyDelete--TJ in SC!
you are seriously amazing.
ReplyDeleteI really love this
ReplyDeleteWhat size of entertainment center is the one you used for this?
ReplyDeleteThanks for getting in touch with me about your pink play kitchen I featured. I would prefer to link over to you as the creator of the product than to lindsay. If you have a post about it, if you could get me the link I would be happy to modify my post!
ReplyDeletehttp://www.creativecarissa.com/2012/01/how-to-build-diy-play-kitchen-part-1.html
What did you use for the burners and knobs?
ReplyDeleteAnna, I used just standard drawer knobs from Hobby Lobby for the burner knobs and for the burners themselves, I used wooden disks painted black with some wire on top.
DeleteHello - Do you have an an option on your blog to 'subscribe to your feed' via email and Google's Feedburner? I'm not crazy about the Google Friend Connect, but would like to get an automatic email when you publish a new post.
ReplyDeleteThis is an amazing kitchen! I think its looks better than my own kitchen, LOL! I’ve never met someone like you who builds toy kitchens for their grandkids! You’re so cool! No wonder she love you so much. Anyway thanks for sharing this, this is a nice idea for a gift that kids will love.
ReplyDeleteGilbert Dubinsky
Hi Denise! I wrote to you yesterday about making one of these for my soon-to-be 2-year-old daughter. Thanks for writing back so quickly!! You told me that this one was probably more toddler-friendly. How tall was this entertainment center? Thanks again!
ReplyDeleteOh and how wide was it? I forgot to ask that in the first post!
DeleteIt is probably about 4' tall and about 6' wide. Any size will do as long as the shelf where you place the sink/stove can by reached by your child. I would love to see pictures when you finish.
Delete